Turning a Raspberry Pi into a modem for your Atari Mega STe.
This, truth be told, isn’t quite as straight forward as the internet would have you believe. In my quest to make this work, I
found USB-to-Serial cables that crashed my Raspberry PI, disabled the Pi’s ethernet port, sent my Mega STe into spasms and
even when it suspiciously looked like it might work, it didn’t.
The first hurdle is Serial-to-USB cables. These aren’t as dumb as you might suspect. They have a chip embedded into them,
and how well that chip is supported varies between kernels in Rasbian.
For example, combining a Raspberry PI with the October release of Rasbian and a prolific PL2303 USB-to-Serial cable looked
exactly like it might work, well the Pi didn’t crash, but no: The ST and the Pi flatly refused to work together.
So here is a kit list that I guarantee will work with Mega STe as simply as possible:
•
1 x Raspberry Pi 3+ B with SD Card with Raspbian Stretch Lite
o
I’m using the October 2018. Kernel Version 4.14.
o
You don’t need a GUI on the Pi, it can all be done via pretty simple command line.
•
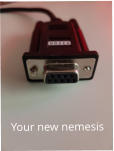
1 x RS232 to USB connector. The keyword to look for when buying a cable is: “RS232”.
o
The Atari Mega STe’s serial connector is a 9pin male, so you will need a female 9 pin
connector on you serial cable. (Like the one in picture on the right.)
Also like this:
AMAZON
NB: Anything else leads to sadness. Sadness leads to anger and anger leads to an Atari Mega STe majestically
flying from a 3rd story window. Also known as: the Dark Side.
How does this all work,
then?
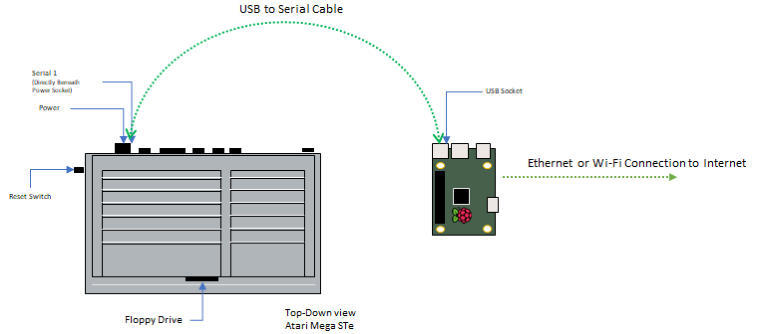
You connect the serial port on your serial cable into the Atari’s serial port 1, which is directly below the Mega STe’s power
input socket and then you connect the USB end into your Raspberry PI. The Raspberry PI will also needs a connection to your
home network to get to the Internet. Either via an Ethernet cable, which is simply a matter of plugging one end of the
Ethernet cable into your Internet router or network hub/switch and the other end into you Raspberry PI or configure Wi-Fi on
you Raspberry PI. Follow these instructions to enable WiFi on your Raspberry PI.
Wi-Fi Instructions
.
In an nutshell the Atari is simply sending regular modem commands to the the RaspberryPi and the Raspberry Pi is acting like
a gateway, reading the BBS online and translating it back to the Atari in a way it understands.
First, you need to configure the Raspberry Pi.
The first thing is your Raspberry Pi can be too
darn fast. You need to slow it down. You can
ignore this step, but weird things happened when
I ignored it.
Slowing down the Pi is simple.
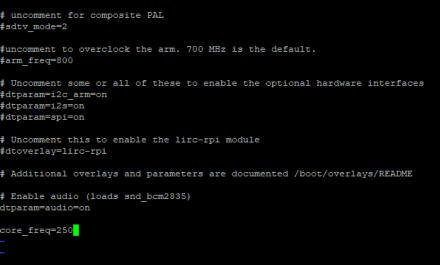
You must edit the /boot/config.txt on the
Raspberry:
First backup your config.txt file, you know, just in
case, by running the command:
sudo cp /boot/config.txt to /boot/config.old
If you prefer “nano” then good for you, I prefer “vi”
it’s easy enough.
Run this command:
sudo vi /boot/config.txt
use the down-arrow key to get to the very bottom
of the file, then press the ‘a’ key. (Short for append)
now type in:
core_freq=250
Press ESC
Press: : (The colon key)
Type: wq!
…and you’re good to go.
wq! tell’s vi to write the file to disk and quit. if you mess up
at anytime just press ESC, then type :q! to just quit
without writing the file and start again.
reboot your Pi by entering:
sudo reboot
Now all that is necessary is to install the
modem software. It’s a tool called:
tcpser.
Run these commands, in order:
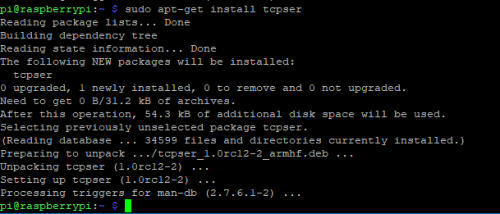
•
sudo apt-get update
•
sudo apt-get upgrade
•
sudo apt install tcpser
Piece of cake, isn’t it?
All that is left, is to run tcpser to act like a modem. This is easy. The most basic command is this:
sudo tcpser -d /dev/ttyUSB0 -s 9600 -l5
Break down of the command:
tcpser is the application
-d flag points tcpser to the USB serial cable device on the Pi
-s flag is the modem speed tcpser is going to run at. 9600 is the default for the VT52 application on the Atari, so
let’s keep it simple.
-l5 flag sets the logging level. Which is kind of cool, as you can see the Atari talking to the Raspberry Pi.
What do you do on the Atari?
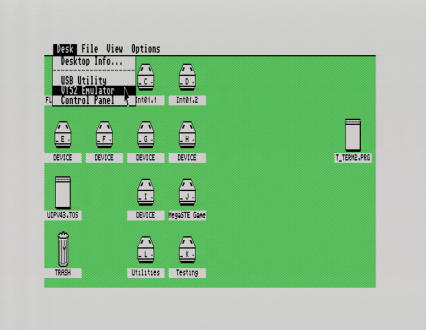
Just to see if it’s all working, I recommend using the
VT52.acc that came on the accessories disk for the
Atari Mega STe. Google for “system disks Atari”, I’m
confident you will find it. Copy the VT52.acc to the root
of your boot drive and reboot the ST. This new app will
appear in the “Desk” menu.
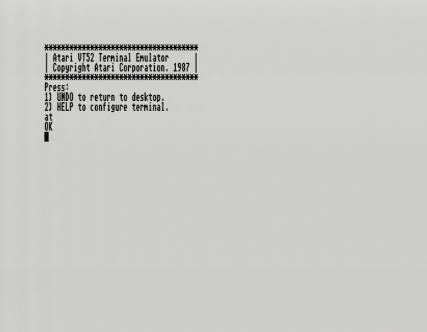
Open the Atari VT52 Terminal Emulator
(See right)
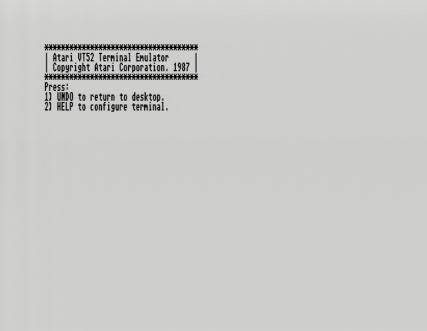
Once you open the Atari VT52 Terminal Emulator it will
look like this. If it only ever looks like this, regardless of
what you press or do, something has gone wrong.
Does it work?
(See right)
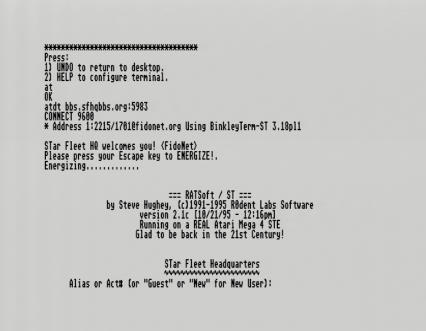
If you enter the modem command “at” by typing at,
and then pressing [return] the tcpser Raspberry Pi
modem should respond OK.
Okay let’s BBS, baby.
(See right)
To get onto a BBS, we need to tell the modem to
‘dial’ a url. This is relatively easy. My personal
favourite BBS is Star Fleet Command, as it’s run on
an Atari Mega STe.
http://sfhqbbs.org/
Type in the command
atdt
bbs.sfhqbbs.org:5983
That’s all, folks!
Okay, you’re own your own now kid. You can continue
to use the VT52 terminal emulator or you can play
around with terminal applications for the ST. Many of
which automate certain things, and make use of dial
directories and the like. I use Teddy Term, some use
Taz or Neocom. Google around choose what you like.
Common Hiccups or something goes wrong and the
modem stops responding.
•
tcpser has crashed. just restart it. It’s pretty
common.
•
Serial speeds don’t match. i.e. you changed the
modem speed on the Pi to 19200 but the Atari is
still talking at 9600. Make sure they match.
Pressing the “help” key while in the Atari VT52
Terminal Emulator will open a menu to change
the speed.
•
Occasionally things go wonky. Yes they do. Other
than simply
seeing
the Atari dial into a BBS using
a Raspberry PI, definitely consider getting a WI-FI
modem if you’re going to make a hobby from
using BBS.


Now Open to the public


My Private Computer Nostalgia
3DO ATARI MEGA STE ATARI FALCON AMIGA 1200 PC ENGINE NEO GEO AES SINCLAIR SPECTRUM +3 ATARI JAGUAR SONY PLAYSTATION
The late 1980s and early 1990s were my personal golden age of gaming. I like tinkering with them, I like seeing what they can do and I like making a website.
So here we are.